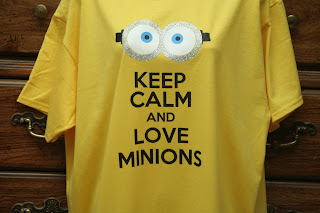
DIY Minion T-Shirt with Sizzix eClips 2
A long time ago I created a Minion T-shirt for a coworker of mine who loves minions.Then recently (like within the last year or two, maybe three) I bought some more yellow T-shirts because I wanted to make more minion T-shirts to sell. I am clearing out my stash of crafts, so I figured I’d better do something with these T-shirts. So, I decided to make more minions. Perfect for Halloween coming up in just a couple months.
*Silhouette Heat Transfer Paper is much thinner, so you only need pressure 4.
Also, so that I’m not wasting vinyl, I like to group the designs together.
After cutting out the designs and taking off the outer pieces of vinyl that you won’t be using, iron your T-shirt. Then lay the SILVER piece down towards the top of the shirt. Do not take off the plastic! It is used as parchment paper. Make sure you do not iron for too long or it will start to melt the plastic. About 15-20 seconds is all it takes. Of course, each iron is different. I use parchment paper on top of the plastic, too.
After you’ve completely let it cool (which can take several minutes), carefully peel off the plastic. Be patient or you could ruin it! Then I like to go over it again with parchment paper, just for a few seconds. Then lay down the WHITE pieces. If the pieces are separated into two pieces, make sure they are not overlapping the plastic. (I’ve done this, and had to peel off the entire white piece and cut a new one.) You shouldn’t have to cut them in two pieces, though, if you keep them at the same distance apart as the original design. It is also much easier for placement if you leave the two on the same piece of plastic.
Lay down the parchment paper over the top of the entire design. This is very important because if you get direct contact with your iron on the vinyl, it could ruin it. Iron for the same amount of time, again letting it completely cool before taking off the plastic. Again, go over it again with the parchment paper.
Then lay down the blue circles and do the same. Then the black pupils and goggles ends.
When you’re completely done, flip over the t-shirt and iron the backside. I recommend putting parchment paper between the shirt where the design is, and the ironing board.
Materials:
- Bright yellow T-shirt
- 11x6” SILVER iron-on vinyl
- 7.5x4.5” WHITE iron-on vinyl
- 3x2” BLUE (or brown, or whatever color you prefer for the iris)
- 4x2” BLACK iron-on vinyl
- Parchment Paper
- My svg minion design (cuts all together, or separated.)
Directions:
Make sure when you place the vinyl on the cutting mat, it is shiny side down. You will be cutting backwards. Because my design is the same either way, there is no need to mirror it. For the settings, I use blade depth 4 and pressure 5 for the regular Cricut* iron-on vinyl, or pressure 6 for the glittery iron-on vinyl. Pressure 7 will cut through the plastic, which you don't want.*Silhouette Heat Transfer Paper is much thinner, so you only need pressure 4.
Also, so that I’m not wasting vinyl, I like to group the designs together.
Then lay down the blue circles and do the same. Then the black pupils and goggles ends.
When you’re completely done, flip over the t-shirt and iron the backside. I recommend putting parchment paper between the shirt where the design is, and the ironing board.
Tips:
- Make sure your blade is sharp
- Use masking tape on the edges of the vinyl to keep it down, when on the mat.


