How to make your own acrylic ruler for under $3
I needed a 7.5” square ruler, but didn’t want to spend $15 on it (Walmart’s online price) and have to wait for it to ship. Joann’s had them for sale for less than $11 but they were out of stock. I really needed to get one for a project I was working on. I hate having to stop in the middle of a project because I don’t have something. Anyway, my brilliant, creative, and helpful husband said, “What about plexiglass at Home Depot? I can cut it for you with my table saw.” I decided to check it out. (By the way, if you do cut it with a table saw, make sure the blade has a lot of teeth and go very slow. Look at this video for explainations.)
I bought an 11x14x.093” clear acrylic sheet for $5.98. He cut it 7.5” square, leaving me with enough pieces to make some other sizes. Then I bought at Joann’s for $6.99 some Silhouette Printable Clear Sticker Paper (comes in 8 sheets, so I have plenty more to use for other projects). I mirrored a ruler image and printed it. The sheets are pretty stiff, so they are easy to work with. I was aprehensive about using this at first. I had tried printing on clear contact paper with my inkjet printer and the ink just smudged, even after allowing it time to dry. But it printed very nicely. It doesn’t smudge. It almost has a “rough” feel to it. The paper must be specially made to absorb ink.
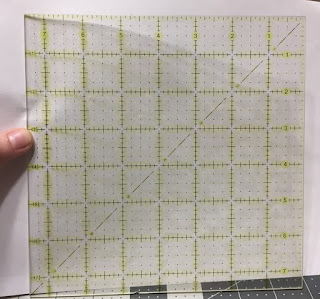
Anyway, I peeled off the backing paper, laid the sheet sticky side up, aligned my acrylic square with the top edge of the printed ruler, and laid the square down. I did this all on my cutting mat. Then I used my rotary cutter to trim the excess sticker paper off the edges. It stuck very well and smooth. It worked perfectly! With the printed sheet on the bottom of the acrylic square, it won’t slide around so much on my fabric. Also, the printed lines are easier to line up with my cutting mat. If you look at the store-bought rulers, they are the same way. The ruler is printed on the bottom.
So the cost of the acrylic sheet cut at 7.5” square, makes it just over $2. For the sticker paper, it’s less than $1 per sheet. So for less than $3, I was able to make something that sells for $15. It just amazes me how closely it resembles the store-bought rulers. Now I know that whatever size ruler I need, I can make!
Here is the ruler photo that I used to print on the paper. If you use it to print, make sure that it is 7.5” wide. If you are going to put it on top of the square rather than on the bottom, you will need to mirror it before printing. To download, click on the image, then it will open the larger image. Then right click, and select “save image.”
Save even more money by using the Ibotta app. Earn a percentage back by scanning your Joann receipt.

.jpg)


