How to Fasten the Back of a Barbie Nightgown/Outfit
I’ve had people wondering how to fasten the back of a Barbie nightgown or outfit, so if you’ve been wondering, this post is for you. There’s basically two ways to fasten the back of an outfit. You can either use velcro (hook and loop) or snaps. First I’ll list the pros and cons of using either.
The downside is that velcro doesn’t look as neat as snaps. It is a little bulky and makes the outfit stiff.
The downside is that they can sometimes be difficult to work with because they are so small and you have to make sure that they line up when sew them on. They are not suitable for small children and toddlers because they are a little difficult to fasten and unfasten, and they could be swallowed if pulled or bitten off.
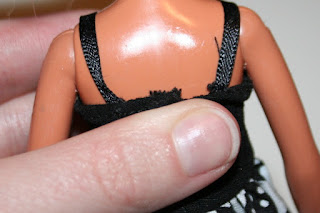
First line up the back to figure out where you are going to place the snaps or velcro.
Velcro
Velcro is really easy to use and work with. You don’t have to be so precise in where you put it and it’s easy to fasten and unfasten. Velcro is good for small children for this reason, and it is safer because toddlers and babies could bite snaps off and swallow them. You can put velcro on using one long strip so that it closes the entire back of the outfit.The downside is that velcro doesn’t look as neat as snaps. It is a little bulky and makes the outfit stiff.
Snaps
Snaps are small and look neat and tidy on the small Barbie outfit. They are not bulky like velcro and you only need to place them in one or two areas.The downside is that they can sometimes be difficult to work with because they are so small and you have to make sure that they line up when sew them on. They are not suitable for small children and toddlers because they are a little difficult to fasten and unfasten, and they could be swallowed if pulled or bitten off.
Fastening the Back
Fastening the back is pretty much the last thing to do when finishing an outfit.First line up the back to figure out where you are going to place the snaps or velcro.
If using velcro, cut the velcro to fit. Then sew the loop side of the velcro onto the top of the left side of the outfit, using a straight stitch about 1/16 from the edges, all along the edges of the piece of velcro. Then sew the hook side of the velcro on the bottom of the right side of the outfit in the same way.
If using snaps, line up the fabric and mark where you are going to place the snaps. You can use a needle to stick inside the fabric where you would have the snaps be, then mark using an invisible ink pen or white chalk pencil if using dark fabric.
There are two pieces to each snap—one is slightly smaller than the other. The smaller one is to be placed on the underside of the top piece of fabric with the prong sticking up. I call this the nipple. The larger piece is to be placed on the top part of the lower fabric so that the hole is facing up.
You can place the snaps inside the needle that you used to mark the center. Then, using a different needle that is double threaded and tied at the end, sew the snaps into place.


