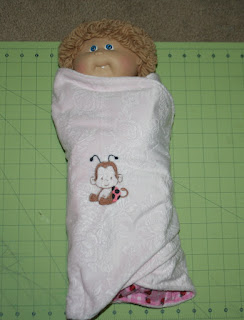
Baby and Doll Swaddling Blanket Tutorial and Pattern
I had some really soft fabric that I’d purchased at Joann’s last year and wasn’t sure what to use it for. Then when I saw my niece at the hospital and she had a swaddling blanket, I decided to make a couple.
It was pretty easy, and fun. My oldest daughter wants me to make one for her doll. And my other daughter wants me to make one for her baby when she grows up and has one.
What you will need:
1 yard flannel
(2) 13 1/2" x 13 1/2" companion flannel
8” velcro
Stabilizer
Temporary spray adhesive
Pattern piece - click here
Step 1:
Cut the fabric using the pattern. You can get the pattern here. There are a few different way you can do it. You can either simply print it once, cut, then tape together where it says to tape it. Then fold your fabric in half one way, then in half the other way, then lay the pattern in the direction so that the straight sides are lined up on the fabric folds. Then cut. That’s how I did it.
Or you can print four pieces and tape them all together to make an oval. Or you can trace the pattern onto the fabric four times, lining it up to make an oval.
Cut 2 ovals.
Cut the 13 1/2 x 13 1/2 inch companion flannel. Cut 2. Or you can use one piece of companion flannel and one piece of the original, as I did.
Step 3:
Print a paper template of the embroidery design that you are going to use, to aid in placement.
Since the design will be on the center front of the swaddler, and it is tri-folded, the embroidery will be 7" from an end, centered in between the top and bottom. Mark the center. I did this by simply folding the oval in half, horizontally. Then measure 7” from the right end on the right side of the fabric.
Hoop the fabric and cutaway stabilizer together, making sure that the vertical and horizontal lines on the design printout match up with the marks on the hoop.
After the design has finished, trim the excess cutaway stabilizer from the backside. If you use tear-away stabilizer, you just have to gently tear it away.
Step 4:
Add a 3 inch strip of hook Velcro to the far left edge of the oval that will be used for the inside. Place it vertically, about 2” from the edge. Pin to keep in place, then sew.
Add two 2 1/2 inch strips of loop Velcro, horizontally, starting about 9 inches from the left edge of the oval that you just embroidered. Place the strips in the center about 1 inch apart. Pin to keep in place, then sew.
Having the hook Velcro vertical, and the loop Velcro horizontal, means that the swaddler can become larger with the infant over time.
Step 5:
Put the two ovals together, right sides together, pin in place, then sew a 1/4” seam, keeping enough open (about 6 inches) at the bottom to be able to flip the fabric right side out. Flip the fabric right side out, then sew a 1/4” finishing seam around the oval. Fold in the opening as you sew around it.
Put the square pieces right sides together, pin in place, and sew 1/4 inch, leaving an opening (about 2 inches) at the bottom. Flip right side out and sew a finishing seam on the left and top side. You do not need to sew a finishing seam around the bottom and right side because you will be sewing it onto the oval.
Make two pleats by pinching and folding 3/4" of fabric, about 1 1/2" from each edge. Pin in place.
Place square at bottom center of oval (the side without the embroidery). Sew a 1/4” seam on right and bottom, and about 2” up the left side. Because by this time, there are four layers (more on the pleats) of fabric, I had to use a heavy fabric needle, such as for denim. I was using my embroidery needle and it broke. In fact, you may have to sew it along the bottom a couple times 1/4” apart because it’s very difficult to work with and keep together straight.


