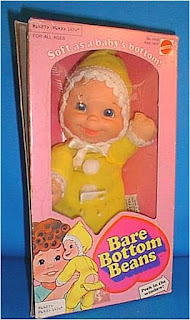
1980 Vintage Mattel Bare Bottom Beans Baby Doll Restore
The most unique thing about this restore is that I used my daughter’s hair for the reroot. I had trimmed about 2 inches from her hair last week, so it was perfect for the reroot. I know you’re anxious to see pics, so here we go . . .
He was such a mess before. His hair was gone, his face was a mess, he was missing a pom pom, a mouse tried to eat his face while he was in my parents’ garage, his lips were fading, and he slumped over. Oh, ya, and several months ago my son decided to color the doll's butt with a marker, so I had to get that off. And over the years Booful’s neck got all black from whatever is inside the neck. I got that out last year.
Before . . .
I put Oxy 10 zit cream
I decided to completely take Booful apart to thoroughly clean him and give him new stuffing, beads, and pom poms.
I washed the head with Magic Eraser (truly is magic!—Love it!)
I washed the head with Magic Eraser (truly is magic!—Love it!)
The head was held on by a string that was stuffed up inside the head.
There was a bag, tied with a string also, that held the beads in.
I was surprised that the neck support was made of plastic. I was expecting metal. Here you can see a real good look at the chomped-on face.
Very interesting beads. They look like rock or some sort of sand. { Found out they are crushed walnut.} The bag that they were in was really dirty, too. This picture really doesn’t show it as dirty as it really was.

Here is all the stuffing.

Here is the very dirty bath water. I just used regular laundry detergent and let it soak for about an hour while I went shopping, then scrubbed it when I got back. The water doesn’t look as dirty in the picture as it was.
Here’s my daughter's hair spread out in sections. I should have made them a little thicker and wish they were longer.
Here is the very "expensive" tool I used to reroot. A regular pencil with a needle stabbed in it. I cut the tip off of the eye of the needle with a pair of scissors.

First I laid the hair down close to where I wanted to put it, then scooped it up with the needle, holding it down with my finger to make sure I got it all. Because the hair was not very long, the end of it is not very far in it. I should have doubled the hair so that the middle was inside the head.
Then I poked it down into the holes that were already there. Before I put the hair in, though, I poked the empty needle in each hole to make sure there was nothing in the way.
So simple.
I used Delta Stencil paint to color the cheeks. Coral was the perfect color for it. I used a Q-Tip for the cheeks and a small makeup brush for his lips and tongue. I later had to redo the lips with acrylic paint because the stencil paint was too light and rubbed off too easily.
I also used my trusty Mini Dremel with 1/2 inch felt wheel to smooth out the bite in the face.
I will need to smooth it out more with my handy Fingernail Buffer .
.
I stuffed him with 100% Naturally Antibacterial Bamboo Fiber (on clearance at Joann’s) and Poly Pellets (also at Joann’s).
And voila!!! He looks so much happier! The hair will need some tamin’ though.
The bonnet will help to lay it down. Just wish I could find it.
The bonnet will help to lay it down. Just wish I could find it.
{I just made one for him! Click here for the tutorial }


