Dress Sewing Project Tutorial
Last weekend I started cutting out the fabric for Annalise's dress, and Kristin's and Annalise's purse. This weekend I got Kristin's purse done and Annalise's dress done. Next weekend I will finish Annalise's purse.
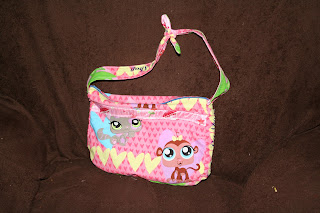
Here is Kristin's purse:
Here is Kristin's purse:
She picked out the pattern and the fabric. I did some changes to it, and didn't quite follow the directions (bad mistake), but it still ended up pretty cute. I got the free pattern (Flirty Floral Handbag) at Joann.com
I also got Annalise's dress (Girl's Zest Dress) pattern at Joann.com
The steps were a little confusing, so I took pictures as I went. Pictures always help me out.
The first step, of course, is making the patterns and cutting out the fabric.
Step 2: Sew the front and back together on the sides. Then do the same with the lining.
Step 3: Sew the ruffles on. The ruffles directions were different from what I'm used to. It said to fold them in half, lengthwise, and sew the ends, then flip them right side out and gather. Then sew them onto the front and backs, like in the picture.
Step 4: Gather the skirt and sew it on the front and back, just like the ruffles.
Step 5: Sew the zipper on the back. If I were to do this dress again, I would get a smaller zipper. It asks for a 14" zipper, but I'm sure it could easily be done with an 8 or 10" zipper. In fact, it'd probably be easier and look nicer.
Step 6: I added this step. The directions say to slipstitch the lining. I thought it would be easier to fold the lining edges over (wrong side to wrong side) and sew 1/4". One problem I ran into is the lining needed to be a little longer and wider on the edges where it says to slipstitch to the zipper and skirt. I didn't make a skirt lining because the fabric I used was good enough without anything under it.
Step 7: Sew right side to right side of lining to bodice along the sleeves and top, turn right side out. Then slipstitch the sides to the zipper and the bottom to the skirt. Then turn the bottom of the skirt 1/2" then 1 1/2" to sew a hem. I used interfacing because the material I used was really stretchy and hard to work with. The interfacing held the fabric in place so that I could sew it. It's only 99 cents a yard at Joann's for the lightweight interfacing--very much worth it.
And voila! Pretty as a princess. Now Charlie wants me to make him one--a shirt, that is.
Another problem I ran into is that the directions say that once you have your pattern made (because you have to measure your girl to make the pattern), you are then supposed to add 5/8" all around it to compensate for the seam. I did not do that, so I had to make all my seems about 1/4". It fit her fine and I made the skirt part of it extra long so that she can grow into it. The sleeves are tied, so they can be adjusted also.
In conclusion, this was a pretty easy dress to make, especially for my first.


