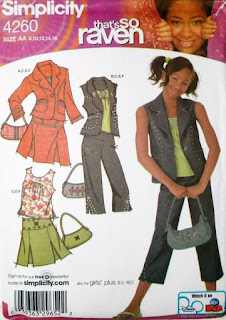
Simplicity 4260 That’s So Raven Pattern Review and Outerwear Contest
Pattern Review Outerwear Contest
Pattern Description: Girls’ Top, Skirt, Cropped Pants, Jacket and Purse. I made View B: the Vest.
Pattern Sizing: 8-16. My daughter wears size 10-12 in RTW and I used size 12 for the pattern. It fit her perfectly.
Did it look like the photo/drawing on the pattern envelope once you were done sewing with it? Pretty much, although I used a different fabric than what they used for the photo on the envelope.
Were the instructions easy to follow? Yes, very easy to follow.
What did you particularly like or dislike about the pattern? I loved how it turned out. I was really surprised at how cute it turned out. When I was putting it together, I wasn’t sure how it would look. I also liked that it was very simple. I didn’t have much time to work on it, so I needed something simple. I’m not sure there’s anything that I didn’t like about the pattern.
Fabric Used: Denim (two different shades, which created a unique look.)
Pattern alterations or any design changes you made: I didn’t make any alterations. I really wanted to stay true to the pattern. And I made this for my daughter, so I wanted her to be happy with how it turned out. One thing I did differently, though, is I inserted the studs for the pocket in the first layer of fabric, then sewed it together so that the spikes wouldn’t poke my daughter. Another thing I did that the instructions did not say to do, is edge-stitch 1/4” all around. This was so that the facing would lay flat better and give it a more finished look.
Photos of pockets:
Using a ruler to mark where to place the studs.
Underside of studs.

Photo of edge-stitch.
The pattern called for light-weight interfacing. Unfortunately I didn’t have enough, so some pieces I used were medium-weight. I was afraid it would be too thick with the denim, but it ended up being just fine. The back Tab also called for interfacing and I didn’t use any because I didn’t think it needed it. I wish I had used interfacing. It is a little too slack.
Would you sew it again? Definitely! I can’t wait to try the other views.
Would you recommend it to others? Yes! It is so simple.
Conclusion: Overall, this was a very easy project and my daughter was HAPPY with it. That’s the important part. The toughest part was lining up the Front with the Side Front. I had to redo it several times because when I’d sew it together, it just wouldn’t line up. The Front just seemed to always be too short—by about 2 inches! Finally I was able to stretch the Front as I sewed it and it finally fit together right.
Photo of Front/Side Front pattern pieces:

Another thing that is important when making the collar, is to cut really close to the inner point. Otherwise it will bunch up.
Photo of point.

I had a lot of fun with the studs (I even bought a Stone Setter.) The denim was almost too thick for them, though. I think next time I will use a little bit of glue on the studs to be sure that they don’t fall out.
Front Photo

Side Photo:

Back:


